The developer of RegCleaner, jv16 PowerTools, Uninstalr, WinFindr, Startup Timer, ScreenshotX, System Examiner and Windows Update Fixer.
Windows search is a built-in search feature available on Microsoft Windows that is notoriously unpopular among Windows users. Typically, users would report that Windows search is unable to look something up if the file name is incomplete, it takes a long time to do the search process, and quite often, they can’t find anything.
The above issues led to the development of third-party apps, such as WinFindr. But, if you’re not keen on installing a new app to improve your searching experience, an alternative you can try is to use Windows search index. Keep reading to find out more about this.
Table of Contents
How does Windows search index work?
Windows search is a feature that allows you to find files and other information you need from your computer system. But, despite being a built-in feature that has existed for quite some time, its functionality is still left to be desired.
One of the most recommended ways to improve Windows search’s function is to enable search indexing. The way it works is fairly simple: when users look up something on Windows, search indexing will scan and create a record of files and other contents related to the search – also known as file indexing.
Over time, Windows search index will create a database based on it, making the search process run faster in the future. This is possible because when users look up search queries in Windows, the system will check the indexed items rather than scan the whole system each time users do a file search.
Pros and cons of Windows search index
As mentioned above, enabling Windows search index will make the search process run faster because the system wouldn’t need to scan the entire system each time users perform a file search.
However, search indexing also requires a lot of CPU resources and storage space. So, if you have an older computer, Windows search index may do more harm than good for your system.
How to enable Windows search index
Here’s how you can enable Windows search indexing on both Windows 10 and Windows 11:
- Open the Indexing Options menu by looking up “Indexing Options” in the Windows search box > click from the search results
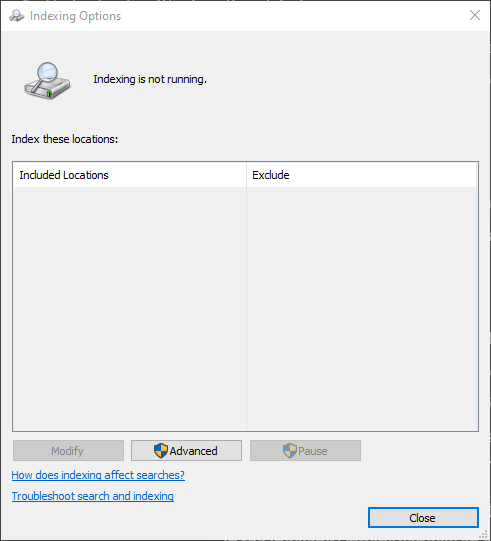
- In the new Indexing Options window, you’ll see the search indexing status
- If it says “Indexing is not running” then you’ll need to enable it by clicking the “Advanced” button
- In the new window, click the “Rebuild” button
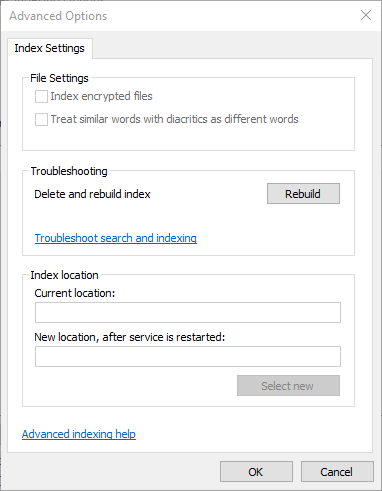
- A new pop-up about Rebuild Index will appear, click “OK” to confirm

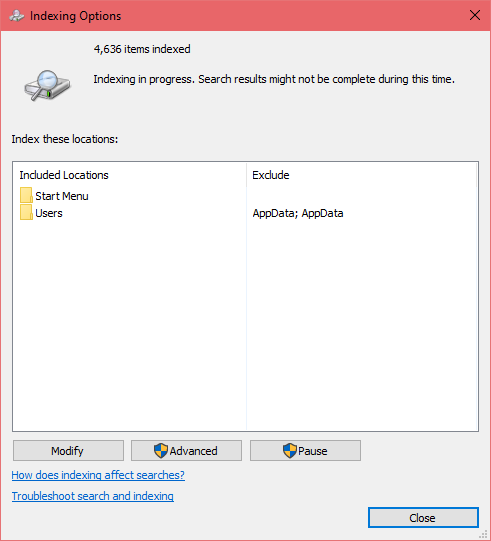
- You’ll see the status of indexing in progress, wait until the indexing process finishes
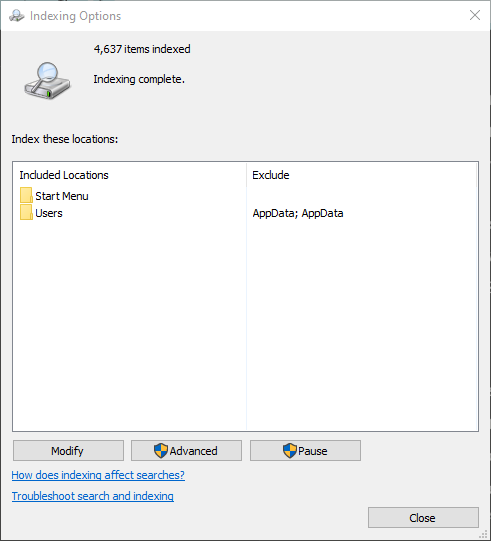
- Once it’s done, click the “Close” button and you’re all set
Customizing Windows search index
Once you enabled search indexing, you can customize the search index location by telling search indexer which locations should be indexed and which ones shouldn’t. This is especially useful if you have some important files that you don’t want to give Microsoft Windows some access to.
Follow these instructions to customize your search index location.
Windows 10
- Open Settings > select “Search” from the menu
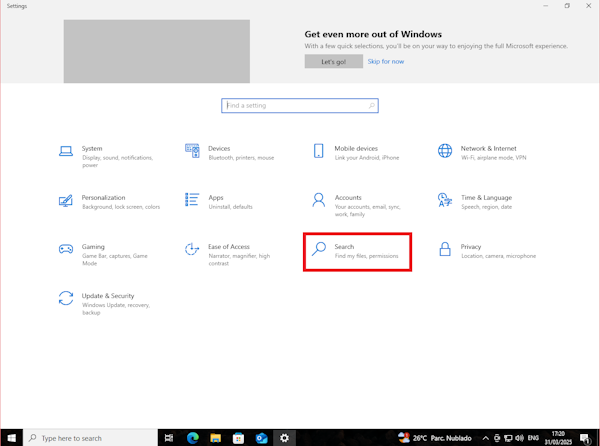
- In the windows, select the “Searching Windows” menu
- Under the “Find My Files” menu you’ll see that there are two options of search indexing modes: Classic and Enhanced. By default, Windows pre-selected the Classic option, meaning that the search indexer is indexing your Documents, Pictures, and Music folders along with the desktop. If you’d like to add more locations, you can click the “Customize search locations here” menu to index more location
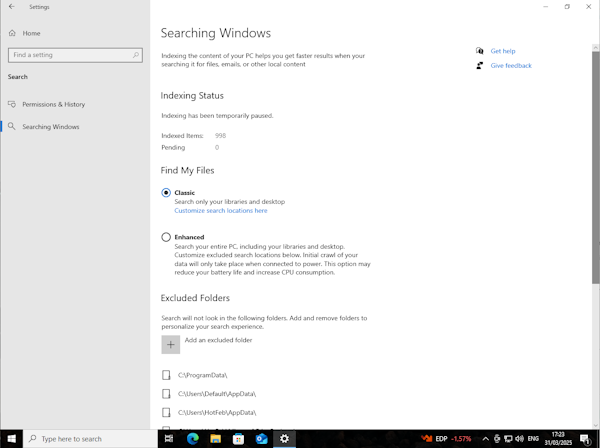
- If you want to index your entire system instead, you can opt for the Enhanced option. This will allow search indexer to scour your entire system. Bear in mind that this option would eat up a lot of system resources
- You can also exclude certain folders from Windows search index by clicking the plus button under the “Excluded Folders” menu
Windows 11
- Open Settings
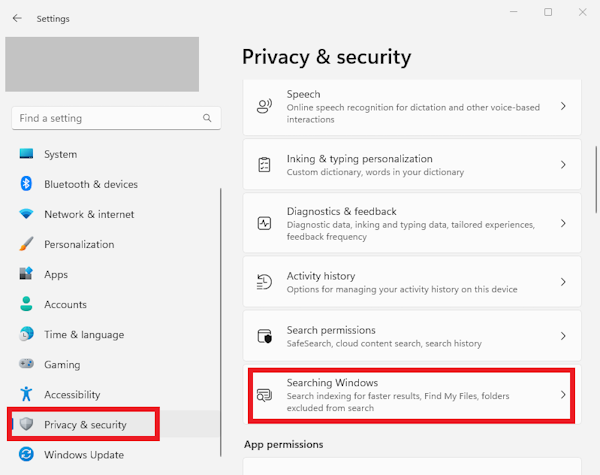
- Select Privacy & Security from the left side menu > select “Searching Windows”
- Under the “Find My Files” menu you’ll see that there are two options of search indexing modes: Classic and Enhanced. By default, Windows pre-selected the Classic option, meaning that the search indexer is indexing your Documents, Pictures, and Music folders along with the desktop. If you’d like to add more locations, you can click the “Customize search locations” menu to index more location
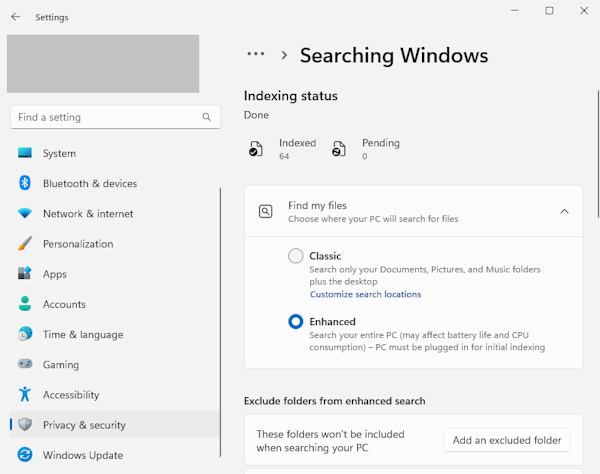
- If you want to index your entire system instead, you can opt for the Enhanced option. This will allow search indexer to scour your entire system. Bear in mind that this option would eat up a lot of system resources
- If you’d like to exclude specific folders from Windows search index, you can click the “Add an excluded folder” button
Conclusion
Windows search index is an alternative you can try to improve your searching experience on Windows. Enabling search indexing on Windows search will allow you to look for different file types and file content in a quicker way because rather than scanning for the whole system, the search indexer would build a catalog of your frequently searched files.
That being said, Windows search index would take up your computer resources so you need to find a perfect balance between ability to search and computer performance. Its ability to search is also limited, especially compared to dedicated Windows search apps available in the market.
If Windows search index isn’t really your liking, you can consider downloading a trusted third-party search app, such as WinFindr. WinFindr is available in portable and setup versions and you can download the app for free from https://winfindr.com/

