


The developer of RegCleaner, jv16 PowerTools, Uninstalr, WinFindr, Startup Timer, ScreenshotX, System Examiner and Windows Update Fixer.
Few things are as stomach-dropping as watching Microsoft Word crash, your laptop reboot, or your screen freeze right after you’ve spent two hours writing something you forgot to save. The good news is that, in most cases, the file isn’t actually gone. Windows and Word have several built-in safety nets that quietly save copies of your work in the background, and there are a handful of ways to get those copies back.
This guide walks you through recovering an unsaved Word document on Windows, step by step. We’ll cover what to do when Word crashes mid-document, when you close without saving by accident, when the power cuts out, and when you simply can’t find a file you swore you saved.
Table of Contents
Before you start: what kind of “unsaved” are you dealing with?
A quick reality check matters here, because the recovery method depends on which scenario you’re in:
- Word crashed while a document was open. Best case. Word almost always recovers it on the next launch.
- You clicked “Don’t Save” by accident or closed without saving. Recoverable through Word’s
Recover Unsaved Documents feature, as long as you’d been working on it for more than ~10 minutes. - You saved the file once, then made changes and lost them. OneDrive version history, or Previous Versions, is your friend.
- The file was saved, but you can’t find it anywhere. It’s a search problem, not a recovery problem.
How to Recover Unsaved Word Documents
Method 1: Restart Word to access Document Recovery task pane
AutoRecover is a feature from Microsoft Word that automatically saves your document at regular intervals. When AutoRecover recovers some document files, the Document Recovery task pane will show up. Try accessing it after any crash, freeze, or unexpected reboot using these steps:
- Open Microsoft Word.
- If Word detects any automatically recovered file from AutoRecover, a Document Recovery task pane will appear.

- When you see this, select Save As to save the document.
If you see your document here, it’s recommended to save it immediately. The pane disappears once you close it, and the temporary files behind it eventually get cleaned up.
Method 2: Use Word’s “Recover Unsaved Documents” feature
If you close Word without saving a new document – meaning the file never got a name or location – Word still keeps a draft by default. You can try accessing it using these steps:
- Open a new Microsoft Word document.
- Click File in the top-left corner.
- Select Info, then click the drop-down in “Manage Document” > select Recover Unsaved Documents.
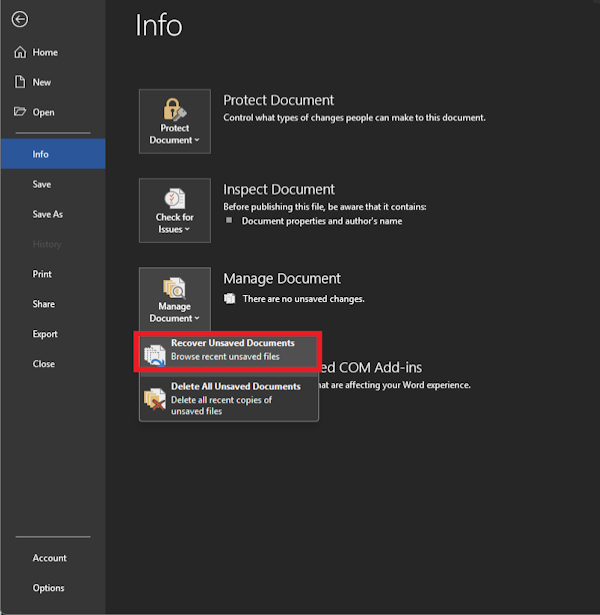
- A File Explorer window opens, pointing to the location of the unsaved document. There, you’ll see files with the
.asdextension. - Select your unsaved document and click Open.
- When the document opens, immediately use File > Save As to save it properly.
This method only works for documents you never saved. For files you saved once and then lost subsequent changes to, skip ahead to Method 5 or 6.
Method 3: Find AutoRecover (.asd) files manually
Sometimes the Document Recovery pane doesn’t show up, or the Recover Unsaved Documents shortcut comes up empty even though you know you’d been working for a while. In those cases, you can hunt down the AutoRecover files yourself.
Word stores AutoRecover snapshots in one of these folders on Windows:
C:\Users\<YourUsername>\AppData\Roaming\Microsoft\Word\
C:\Users\<YourUsername>\AppData\Local\Microsoft\Office\UnsavedFiles\
Note: In these paths, replace <YourUsername> with your username.
To check:
- Press Windows key + R to open the Run dialog.
- Type
%AppData%\Microsoft\Word\and press Enter. - Look through the folder for files ending in
.asd(AutoRecover) or.wbk(backup copy). - If you find one that matches your document, double-click on the file to directly open it with Word. You can also copy it to your Desktop, change the extension from
.asdto.docx, and try opening it with Word later.
If that folder is empty, you can confirm exactly where Word is saving AutoRecover files on your machine by opening Word, going to File > Options > Save, and checking the AutoRecover file location field.
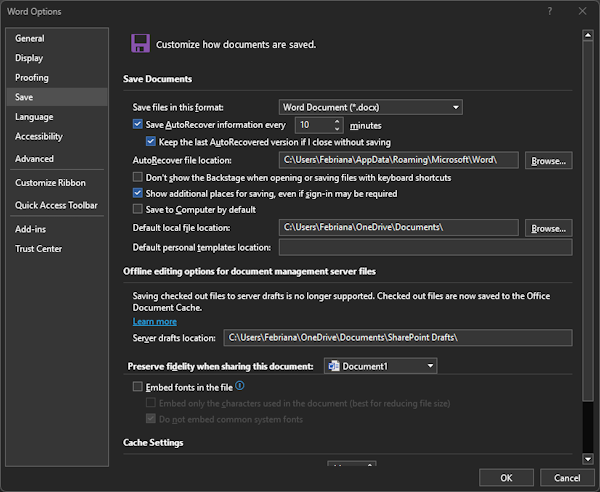
If you’re reading this far and finding this tedious already, you can skip the above steps and use WinFindr to directly find the .asd files:
- Open WinFindr.
- Under the Search terms menu, type in asd in the box.
- Under the Search for menu, select only the “Files” option. Then, under the File search settings menu, tick the “Look for files of specific type” > type in asd in the search box. Click the Start button.
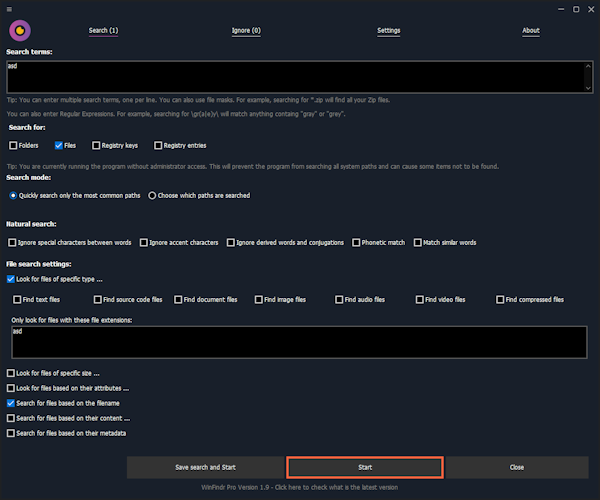
- WinFindr will locate the .asd files you’re looking for, regardless of where Office decided to put them. Double-click the search result to open.

Method 4: Restore from OneDrive AutoSave version history
In the case where you accidentally deleted a document that was saved to OneDrive, you can try to restore it from OneDrive’s recycle bin. Here’s how:
- Go to onedrive.com and sign in to your OneDrive account.
- Navigate to the Recycle bin folder containing the document.
- Right-click the deleted document and click “Restore”.

However, if you want to revert to a previous version of the document after saving it to OneDrive, you can try to restore it through Version History:
- Go to onedrive.com and sign in to your OneDrive account.
- Navigate to the “My files” folder containing the document.
- Right-click the document and click “Version history”.
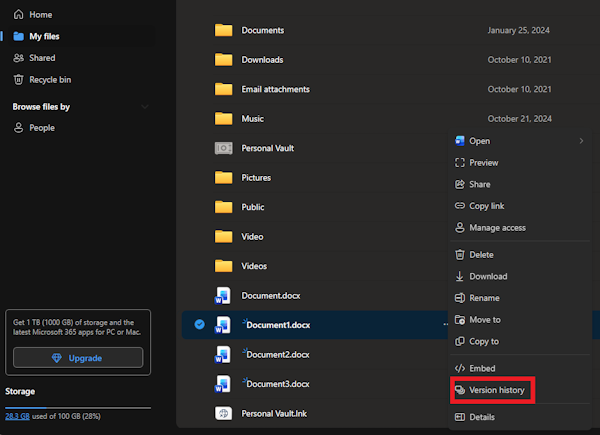
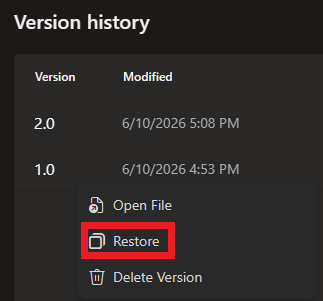
- A pane opens showing all previous versions with timestamps will show up; click the version to download it, or right-click at the timestamp and select “Restore” to restore the version.
Method 5: Use File History or Previous Versions
In another case where you need to recover a previous version of a document, you can use the File History feature since Windows has its own backup system that runs separately from Word.
- Open File Explorer and navigate to the folder where the Word document was saved.
- Right-click the file (or the folder, if the file is gone entirely).
- Select Properties, then click the Previous Versions tab.
- You’ll see a list of available restore points if any exist. Select the most relevant one.
- Click Restore to overwrite the current file, or Open to inspect the older version first.
If the Previous Versions tab is empty, File History isn’t enabled on your system, and this method won’t help for this particular file – but it’s worth turning on for next time.
Method 6: Check the Recycle Bin
This sounds obvious, but it’s missed surprisingly often. If you accidentally deleted the Word file rather than losing unsaved changes:
- Open the Recycle Bin from your desktop.
- Sort by Date Deleted to find the file quickly.
- Right-click the file and select Restore.
The file will return to its original location.
When you can’t find the file: locating missing Word documents
Sometimes the document was saved successfully – you just can’t remember where.
Maybe you hit Save in a hurry, and Word defaulted to an unfamiliar folder. Maybe a sync conflict moved it, or maybe you’re sure you saved it, but the filename you remember doesn’t match anything in File Explorer.
Built-in Windows Search will sometimes find it, but the search index frequently misses files in less-indexed locations, such as external drives, network shares, system folders, and deeply nested project directories.
If Windows Search isn’t finding the file, here’s a structured approach:
- Search by partial filename or content. If you remember even a phrase from the document, search by content rather than filename. File Explorer supports this with the
content:operator (e.g.,content:"quarterly review"), but content search only works reliably on indexed locations. - Cast a wide net by extension. Open File Explorer, go to “This PC”, type
*.docxin the search bar, and sort by Date modified. Repeat with*.asdfor AutoRecover files. - Use a third-party search tool. Built-in Windows Search has well-documented limitations – slow indexing, indexed-locations-only content search, no real wildcard support, and no way to search by date range and extension, and content at once. WinFindr is purpose-built for this: it scans every drive in parallel (including external and network drives), lets you combine criteria like
.docxor.asdfiles modified in the last 3 days containing the phrase ‘project plan’, and returns results in seconds. For “I know I saved it somewhere” situations, it’s usually the fastest path from panic to opened file.
Once you find the file, immediately make a backup copy somewhere stable.
How to prevent losing a Word document again
Recovery is great, but not losing the file in the first place is better. A few settings worth tweaking once and forgetting about:
- Shorten the AutoRecover interval. By default, Word saves a snapshot every 10 minutes. In File > Options > Save, change Save AutoRecover information to every 1 or 2 minutes.
- Turn on AutoSave for cloud files. If your documents live on OneDrive or SharePoint, the AutoSave toggle at the top of the Word window saves every change in real time. Combined with version history, this makes “unsaved work” almost impossible to lose.
- Enable File History. In the Control Panel, go to System and Security > File History and turn on File History with an external drive or network location. Once it’s running, every file in your Documents folder gets versioned automatically.
- Keep the “Keep the last AutoRecovered version” option on in Word. Go to File > Options > Save > make sure to tick the “Keep the last AutoRecovered version if I close without saving” box. This ensures Word keeps the last AutoRecover snapshot even if you close without saving.
- Audit where your Word files actually live. A surprising number of “lost” documents are just saved to forgotten folders – Downloads, a OneDrive subfolder, an old project directory. Once a quarter, run a full-drive search for
*.docxand*.docto see what you actually have. WinFindr can do this across every drive at once and group results by folder, which is a useful way to spot files that wander into the wrong place before you actually lose them. - Save early, save often. Ctrl + S becomes muscle memory faster than you’d think.
Final thoughts
Losing a Word document feels catastrophic at the moment, but Windows and Word together provide multiple recovery paths, and you’ll usually find your work intact in one of them. Run through the methods above in order, starting with the Document Recovery pane and working through to Previous Versions if needed. Once you’ve recovered the file, take five minutes to shorten your AutoRecover interval, enable AutoSave for cloud files, and turn on File History – so the next time something goes wrong, you won’t need a guide like this one.