


The developer of RegCleaner, jv16 PowerTools, Uninstalr, WinFindr, Startup Timer, ScreenshotX, System Examiner and Windows Update Fixer.
Windows search not working is a surprisingly common problem. Though there are no official statistics on how often this happens (at least that we’re aware of), there have been reports on this in the past. One example is a report about the Windows 10 KB4515384 update, which caused issues with search back in 2019.
There are also discussions on Reddit about this topic from time to time. Some reported issues take the form of the following:
- Missing or invisible search bar.
- Search bar not responding to clicks.
- Search bar opens but shows no results.
- Search is extremely slow.
If you experience any of the above issues and are looking for a solution, then this article is for you. Here, we’ll show you different methods you can try to fix the issue of Windows search not working.
Table of Contents
How to fix Windows search not working
In this section, we’ll show some methods you can try to fix the issue, along with a step-by-step guide on how to do it.
Restart Windows system
There’s a reason why the standard first response in technical support is, “Have you turned it off and on again?” – sometimes a simple restart is what you need.
In Windows 11, you can click the Windows/Start button > click the power button > select “Restart” to restart your system.
Check for Windows Update
One of the easiest methods is by checking for Windows Update. This is because Microsoft frequently ships fixes to reported issues – including issues with searches in Windows updates.
To check whether you have the latest update in Windows 11, you can simply type in “Windows Update settings” in the Windows search bar, then select the menu from the search results. You’ll be redirected to a new window where it’ll tell you whether the latest update has been installed.
If you don’t have the latest updates, you’ll need to install them and then restart your system to see if it fixes your search issues.
Restart Windows Explorer / File Explorer
Another easy method to fix search issues is by restarting the file explorer from the Task Manager. Here’s how:
- Open Task Manager by typing in “Task Manager” in the Windows search bar > click on the search results.
- In the Task Manager window, scroll down until you find File Explorer. Right-click on it and select “Restart”.

Restart Windows Font Cache Service
This method is one of the least complicated ways to fix Windows search not working. Here’s how:
- Type in
services.mscin the Windows search bar to open the Services console. - In the new window, look for Windows Font Cache Service > right-click and select “Stop”.

- Try to do a search again.
- Repeat the first and second steps, but this time select the “Start” option.
Restart the Windows search process
One method you can try to fix the issue is by restarting the Windows search process via Task Manager. Here’s how:
- Open Task Manager by right-clicking on the Windows start menu > select Task Manager.
- In the Details tab, look up SearchUI.exe (Windows 10) or SearchHost.exe (Windows 11). When you find it, right click on it > select “End task”.

- A new pop-up will appear; click the “End process” button to confirm the restart.
The above will stop the Windows search process, but the next time you’re doing a search, the process will automatically start again.
Run Search and Indexing Troubleshooter
Windows has its own built-in tool to fix issues with searching, called the Search and Indexing troubleshooter. Here’s how you can use it on Windows 11:
- Open Command Prompt.
- In the new Command Prompt window, type in the following command:
msdt.exe -ep WindowsHelp id SearchDiagnostic
- Troubleshooter will open; click the “Next” button. Select the issue that’s applicable to your situation and click the “Next” button again.
- Wait until the troubleshooter detection process finishes.
Rebuild Windows Search Index
Another method you can try is to rebuild the Windows Search Index. Here’s the step-by-step on how to do it:
- Open Windows Settings by clicking the Start menu > select “Settings”.
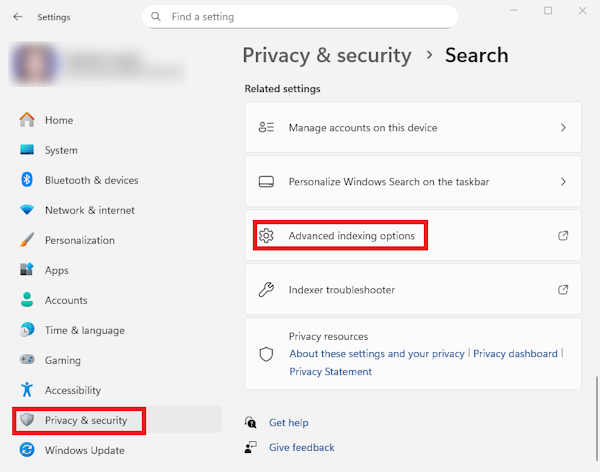
- In the new window, select “Privacy & security” menu > select “Search”.
- Scroll down until you find the “Related settings” menu, then select “Advanced indexing options”.
- In the new “Indexing Options” window, select the “Advanced” button. This will prompt the Advanced Options window to open.
- Click the “Rebuild” button.
- A new confirmation pop-up will appear; select “OK” to start the index rebuilding process. Wait until it completes.
Check for Corrupted System Files
If the search issue is related to corrupted files, you can use DISM and SFC tools to check and repair those. Here’s how:
- Make sure you have Administrator access to your system.
- Look up “cmd” in the Search bar > in the search results, right-click “Command Prompt,” and select “Run as administrator.”
- In the new Command Prompt, type the following command and hit Enter > wait until the scan is completed.
sfc /scannow
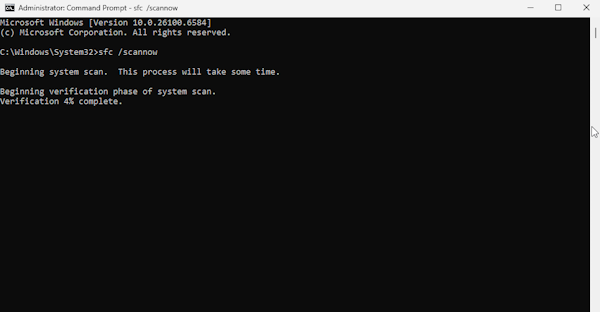
If by the end of the scan SFC tool shows an error message, you can proceed to the next step which is running the DISM tool. Here’s how:
- Type the following command and hit Enter > wait until the scan is completed.
DISM /Online /Cleanup-Image /CheckHealth
- Next, type the following command and hit Enter > wait until the scan is completed.
DISM /Online /Cleanup-Image /ScanHealth
- Then, type the following command and hit Enter to perform DISM Restore > wait until the process is completed.
DISM /Online /Cleanup-Image /RestoreHealth
- Restart your computer and see whether this fixes your issues.
Reset Windows Search
One method you can try is to reset Windows search from PowerShell. Here’s the step-by-step to do it in Windows 11:
- Make sure you have Administrator access to your system.
- Look up “PowerShell” in the Search bar > in the search results, right-click “ Windows PowerShell,” and select “Run as administrator.”
- Make sure that you have an unrestricted execution policy in PowerShell. You can use the following PowerShell command to check:
Get-ExecutionPolicy
- If your execution policy is Unrestricted, you can proceed to close the PowerShell window and download the “Reset Windows PowerShell” script.
If your execution policy is not “Unrestricted”, then you’ll need to copy the value of your current execution policy then save it somewhere – like Notepad, for example. You’ll need it again at a later stage. After copying and saving the value, you need to run the following command to change your execution policy. Choose Y and hit the Enter button to confirm the execution policy change. Close the PowerShell window after you’re done with the command.
Set-ExecutionPolicy -Scope CurrentUser -ExecutionPolicy Unrestricted
- Download “Reset Windows PowerShell Script” from this page: https://www.microsoft.com/en-us/download/details.aspx?id=100295.
- In Windows Explorer, Right-click the downloaded file (the name should be ResetWindowsSearchBox.ps1) and select “Run with PowerShell”.
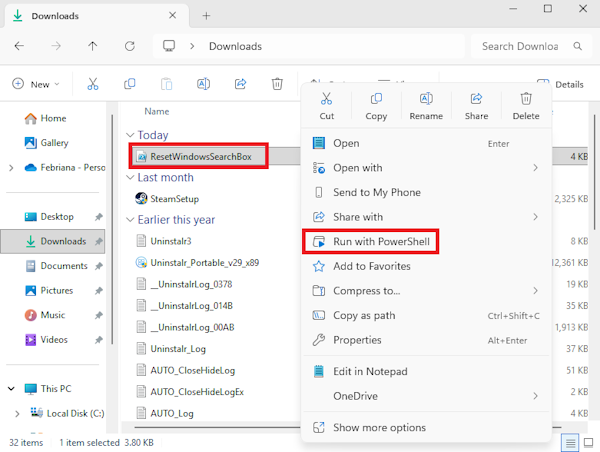
- A new warning, which asks “Do you want to allow this app to make changes to your device?” will pop up, select the “Yes” option to continue.
- The script will run the resetting process, wait until you see the word “Done…” show up. This indicates that the process has been completed.
- If you didn’t change the execution policy in the previous step, you can just close the PowerShell window.
If you changed your execution policy, you’ll need to press any key to continue and type in the command below. Bear in mind that you must replace the <PreviousValue> with the previous value you saved in the previous stage.
Set-ExecutionPolicy -Scope CurrentUser -ExecutionPolicy <PreviousValue>
Third-Party Search Alternative
If the steps listed above still don’t fix the issue of Windows search not working, you may want to consider third-party search alternatives to Windows search, such as WinFindr.
WinFindr is a Windows file and registry search tool that we developed. It’s lightweight, easy-to-use, and most importantly, it works. The app itself supports various searching modes; it can go as simple or as advanced as you want.
Conclusion
Windows search not working is surprisingly a common issue. If this still doesn’t deter you from keeping Windows search as your default search app, then you can try different ways to fix the issue which we have listed above.
However, if you’re open to another alternative to Windows search, then we’d recommend our very own search app: WinFindr.
WinFindr is a lightweight and easy-to-use Windows file and registry search tool. The app supports various search modes, and it’s very customizable. It’s available as a Setup or Portable version, and you can download it for free from this website: https://winfindr.com/